Sunday, December 02, 2012

KINETIC 1/48 Scale A6-E Intruder

This the A6-E Intruder from Kinetic. I just can't seem to get enough of US Navy aircraft can I? :)

It was a good build. However there a couple of fitting problems especially in the cockpit tub. It just wouldn't fit when the 2 fuselage halves were put together. I had to sand/shave/slice off certain parts of the tub to get it to fit. The ejection seats, when put in the cockpit, look a bit too low (based on reference photos), so I propped it up with some styrene glued underneath the seat.
The nose landing gear and strut didn't look as busy as the real one, so I added some wires to simulate hydraulic lines. There are also quite a number of mistakes in the instruction sheet. One of them I remember is that the instruction sheet tells you to put the fuel tanks under the outer wing pylon and the bombs (forgot what they're called) under the inner wing pylon. When I looked at the reference photos, it was the other way round (bombs on the outside). I'm not sure in real life if the positions can be swapped but I decided to follow with the real aircraft. So for you guys who plan to build this model, please do research and collect some reference photos and don't follow the instruction sheet blindly :)

On this model I used the same method as I did for the S3 Viking previously, that is to sand away and remove the seam line between the canopy (in this case the front canopy window) and the aircraft fuselage.

The surface detail was poor. I wasn't impressed with the panel lines. Most of the panel lines were too wide and shallow, which makes it hard to apply a wash. Other panel lines just stopped halfway. I decided to improve the appearance of the panel lines by rescribing everything. I did this by running the scribing tool along the existing panel with several passes, using more pressure with each pass, thereafter, using a 400 grit sanding film, I sanded on the surface around the panel lines. After several rounds of doing this, you'll realise that the panel line becomes deeper (because you're continually scribing) and narrower (because you're sanding the area around it). This will make it easier for the wash to flow afterwards.

Also, the tail of the model was completely void of any detail. So all panel lines were scribed from scratch with reference to photos of the real aircraft.
The panel lines for the leading edge slats were also rescribed as they were inaccurate.


Overall this was a tedious build as a lot of preparation needed to be done to the surface before any priming or painting could commence. I really wish the surface detail could be as good as Hasegawa or Tamiya. I also didn't feel that the shape of the aircraft looked like the real one. It seems to me that the real aircraft has a fatter and shorter nose (I could be wrong, A6 experts please comment). I would think the Revell A6 looked more like the real thing (but that one doesn't have recessed panel lines and a wing fold mechanism). A point to note is that the Kinetic A6 was released after the Prowler, and I suspect several of the parts could have been recycled as a cost saving move, and hence this could be the reason for some innacuracies.

Saturday, July 14, 2012

ITALERI 1/48 Scale S-2 Tracker (Australian Navy)

This is the Italeri 1/48 Scale S-2 Tracker in Australian Navy markings.

I've learnt my lesson from my first Tracker build and added more nose weight. Lots of it. My first Tracker was a tail sitter. On this model, the entire front section from just behind the cockpit to the small side windows was compartmentalised with plastic card. The space inside was filled with fishing lead weight. Super glue was poured into the space so that the weight won't shift around. The front part of each engine just behind the cylinders was compartmentalised as well and lead weight was put in. The nose section in front of the cockpit (even though space limited) had weight put there as well. Also for the little space beneath the cockpit. This model weighs like a brick I tell ya... :)


This model is meant to be a clean built with not a lot of weathering applied.


Saturday, March 24, 2012

ITALERI 1/48 Scale S-3 Viking

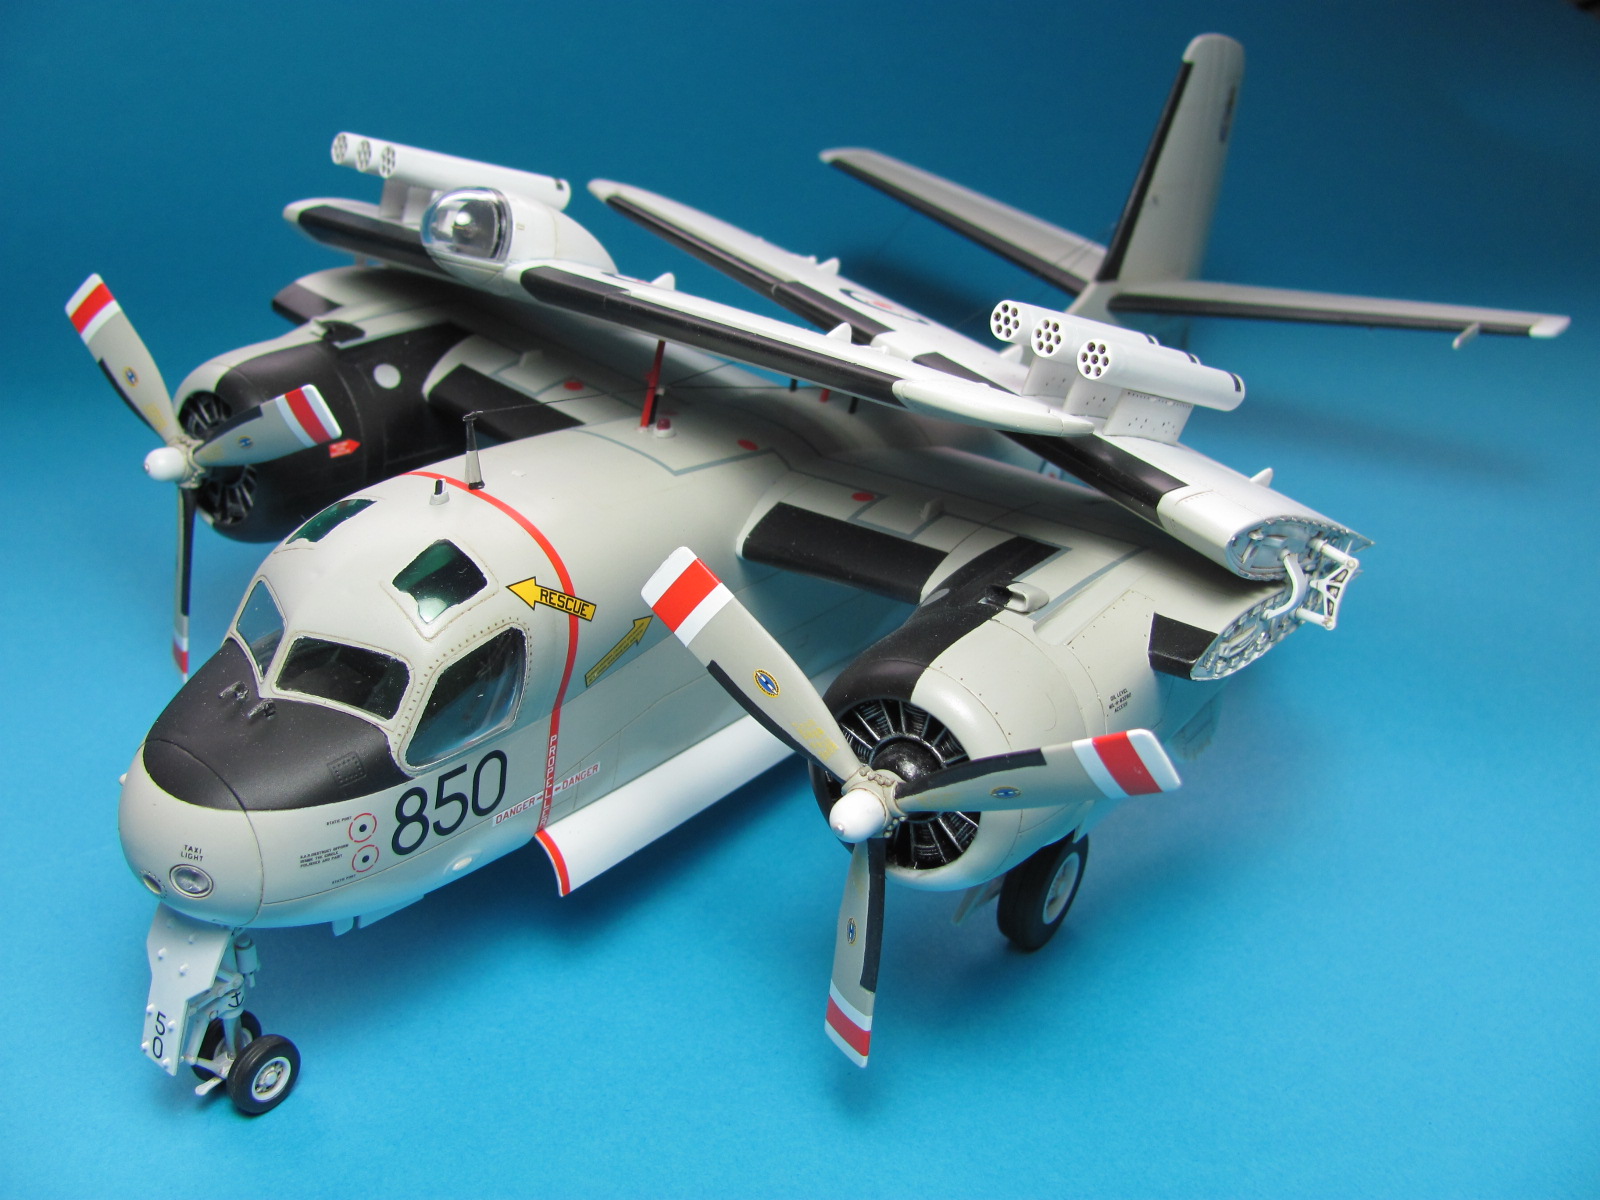
This is the completed 1/48 S-3 Viking from Italeri.
 
This model was built completely out of the box for a customer. It is a straightforward built as there are not a lot of parts. However the quality of the supplied decals was very bad.

Unfortunately the Italeri kit doesn't come with a wingfold, so if you want to make it with wings folded, you'll have to use after market parts to achieve that.
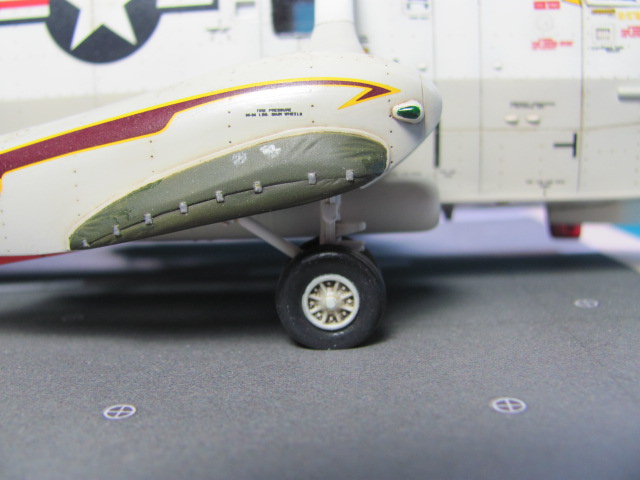
I took great pains to remove the seam lines between the canopy and the fuselage, as this is how it is on the real aircraft (see below pic). The process was tedius though, with iterative puttying and sanding and taking care not to scratch the clear parts. But the final results make a world of difference as it makes the canopy and fuselage look like one single piece.
 
The pic below is the real aircraft (Copyright of Luc Colin) showing the seamless integration between the canopy and fuselage.
 
 It was a nerve wrecking experience applying the decals on the tail and also the anti skid walkway. The decals were thin and breaking up often. Here's a tip for applying large decals like this: cut the decal into smaller pieces and apply them separately. It'll be easier to handle this way.


 Painting was done with lacquers from Mr Color with H307, H308 and H337. Ths usual colors used with most US Navy 'Low Vis' aircraft. Preshading was done with German Gray on the panel lines and other random areas, then the main color (H308) was painted on. Finally 2 drops of white was added to H308 and with the airbrush pressure set to about 10 psi, patchwork was done on random panels on the aircraft. This gave the model a somewhat worn and weathered look, with light and dark patches all over, but not overly dirty. A bit of Mahogany was also lightly sprayed randomly at different spots on the model. The model was then glossed up for decal application and washing. The wash on the panel lines was done with oil colors. When all was done, Mr Color Flat Clear was sprayed over lightly, with care not to make the model completely flat. Leave a slight sheen.


OK I broke the "Out of the box" rule by adding scratchbuild seatbelts :)
This is an older release from Italeri, the whole canopy tinted brown. I believe the newer releases have clear canopies (?) In any case, on the actual aircraft, not every window is tinted with the same shade. The front two windows have a gold tint on them. I tried to replicate this by spraying Tamiya gold to the insides of the canopy windows (see below pic). But don't spray too much until the window becomes opaque!

I also need to mention that the cockpit details are very rudimentary. The cockpit panels are provided with decals which don't look real. I've read elsewhere that once the canopy is assembled, you can't really see the insides because the canopy is tinted. I think this is subject to how you want to display your model. If you were to look close up through the canopy, you really can see a lot of the stuff inside. So getting an aftermarket cockpit set for the S-3 will be quite a good idea.


This was truely an enjoyable built! One thing for sure, this will definitely not be my last Viking. I look forward to my next built whenever that may be, where I'll be sure to include wing folds and aftermarket decals. I hope you enjoyed the pics!

Sunday, January 15, 2012

HASEGAWA 1/48 Scale SH-3H Seaking

This is the completed model of the Hasegawa 1/48 scale SH-3H Sea King.
The kit took me about 6 months to complete, working only on weekends.


Some scratch building was done, mainly to the cockpit area, antenna wirings, and some plumbing on the rotor head. Decals used are for the HS-12 squadron, the Wyverns of the US Navy.


The red fire extinguisher was made from sprue, and filed and sanded to shape. I glued it to the back wall, just next to the window and behind the pilot's seat, although I'm probably wrong about the actual position of the extinguisher. I just wanted to put it in a place where it can be easily seen from the outside.


Below is the rotor head, with scrtach built plumbing using flexible wire, then sprayed with black, and dry brushed with silver.


Model helicopter cockpits are quite visible from the outside, so some effort should be spent in putting some level of detail into it. Here very fine copper wire was coiled around the smallest drill bit used for my pin vise, and then stretched out a little bit and super glued into the cockpit area to simulate intercom cables. I also created a little fire extinguisher from plastic sprue, as can be seen from some of the other photos.
The cockpit looks interesting and busy from the outside.


I like the main rotor blades. They come already bended to simulate the weight, so there's no need to bend it yourself.


Scale Modeling Books